Loading... ## 原理 常见的MSAA算法是在光栅化的过程中对于每一个采样点进行多次采样,根据子采样点的覆盖率来实现抗锯齿的效果,其需要额外的存储空间,而且不适用于延迟渲染。 ### 静态场景 而**TAA**(**Temporal Anti Aliasing**)反走样算法的做法是:**将多次采样的过程分布到每一帧当中去**,也即每一帧都会采样历史几帧的数据。这就需要我们在每次采样的时候都进行一些偏移,而非在像素中心点,如下图。这一过程叫做 **抖动**(**jitter**) 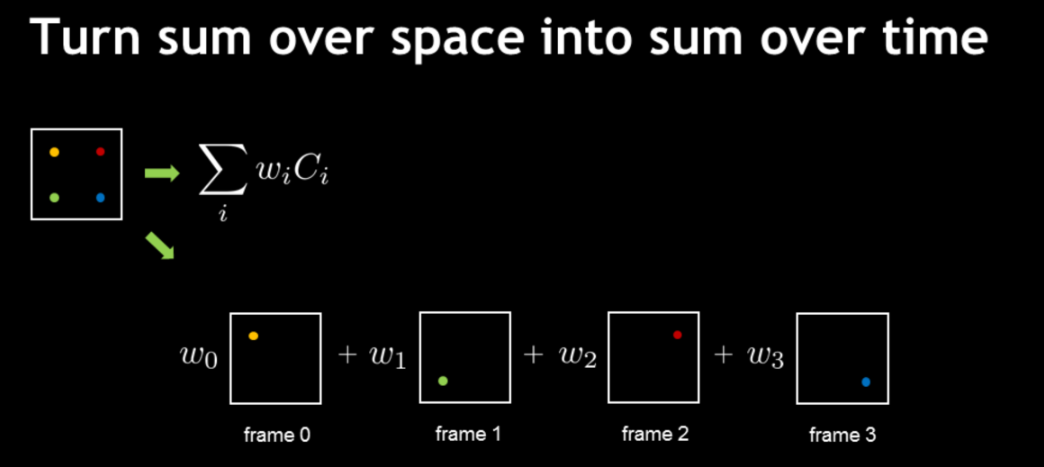 当然我们不可能会完全把历史N帧的结果存储下来,那样开销依然会很大。我们采用动态混合的方法: $$ P_t = (1-\alpha)\cdot P_{t-1} + \alpha\cdot c_t $$ 其中 $P_{t-1}$ 是上一帧的历史信息,$c_{t}$ 是当前帧的颜色结果,$\alpha$是一个系数,一般取0.05。 ### 动态场景 场景和相机的视角都有可能会发生变动,这就导致某一个像素点在上一帧中并不在当前这个屏幕坐标上。为了获取动态物体的某一个像素在上一帧的对应屏幕空间坐标,我们还需要记录其上一帧的MVP矩阵,来进行**重投影**(**Reprojection**)。这样得到的两次屏幕坐标的位移记录下来,我们称之为**Motion Vector** 或者 **Velocity**。这一信息可以顺便用来实现动态模糊。 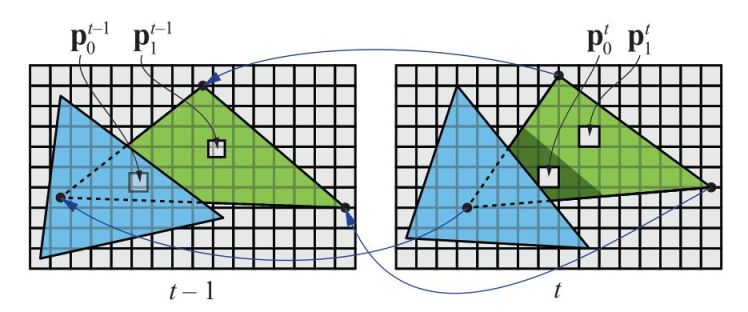 整个TAA的流程可以总结为: 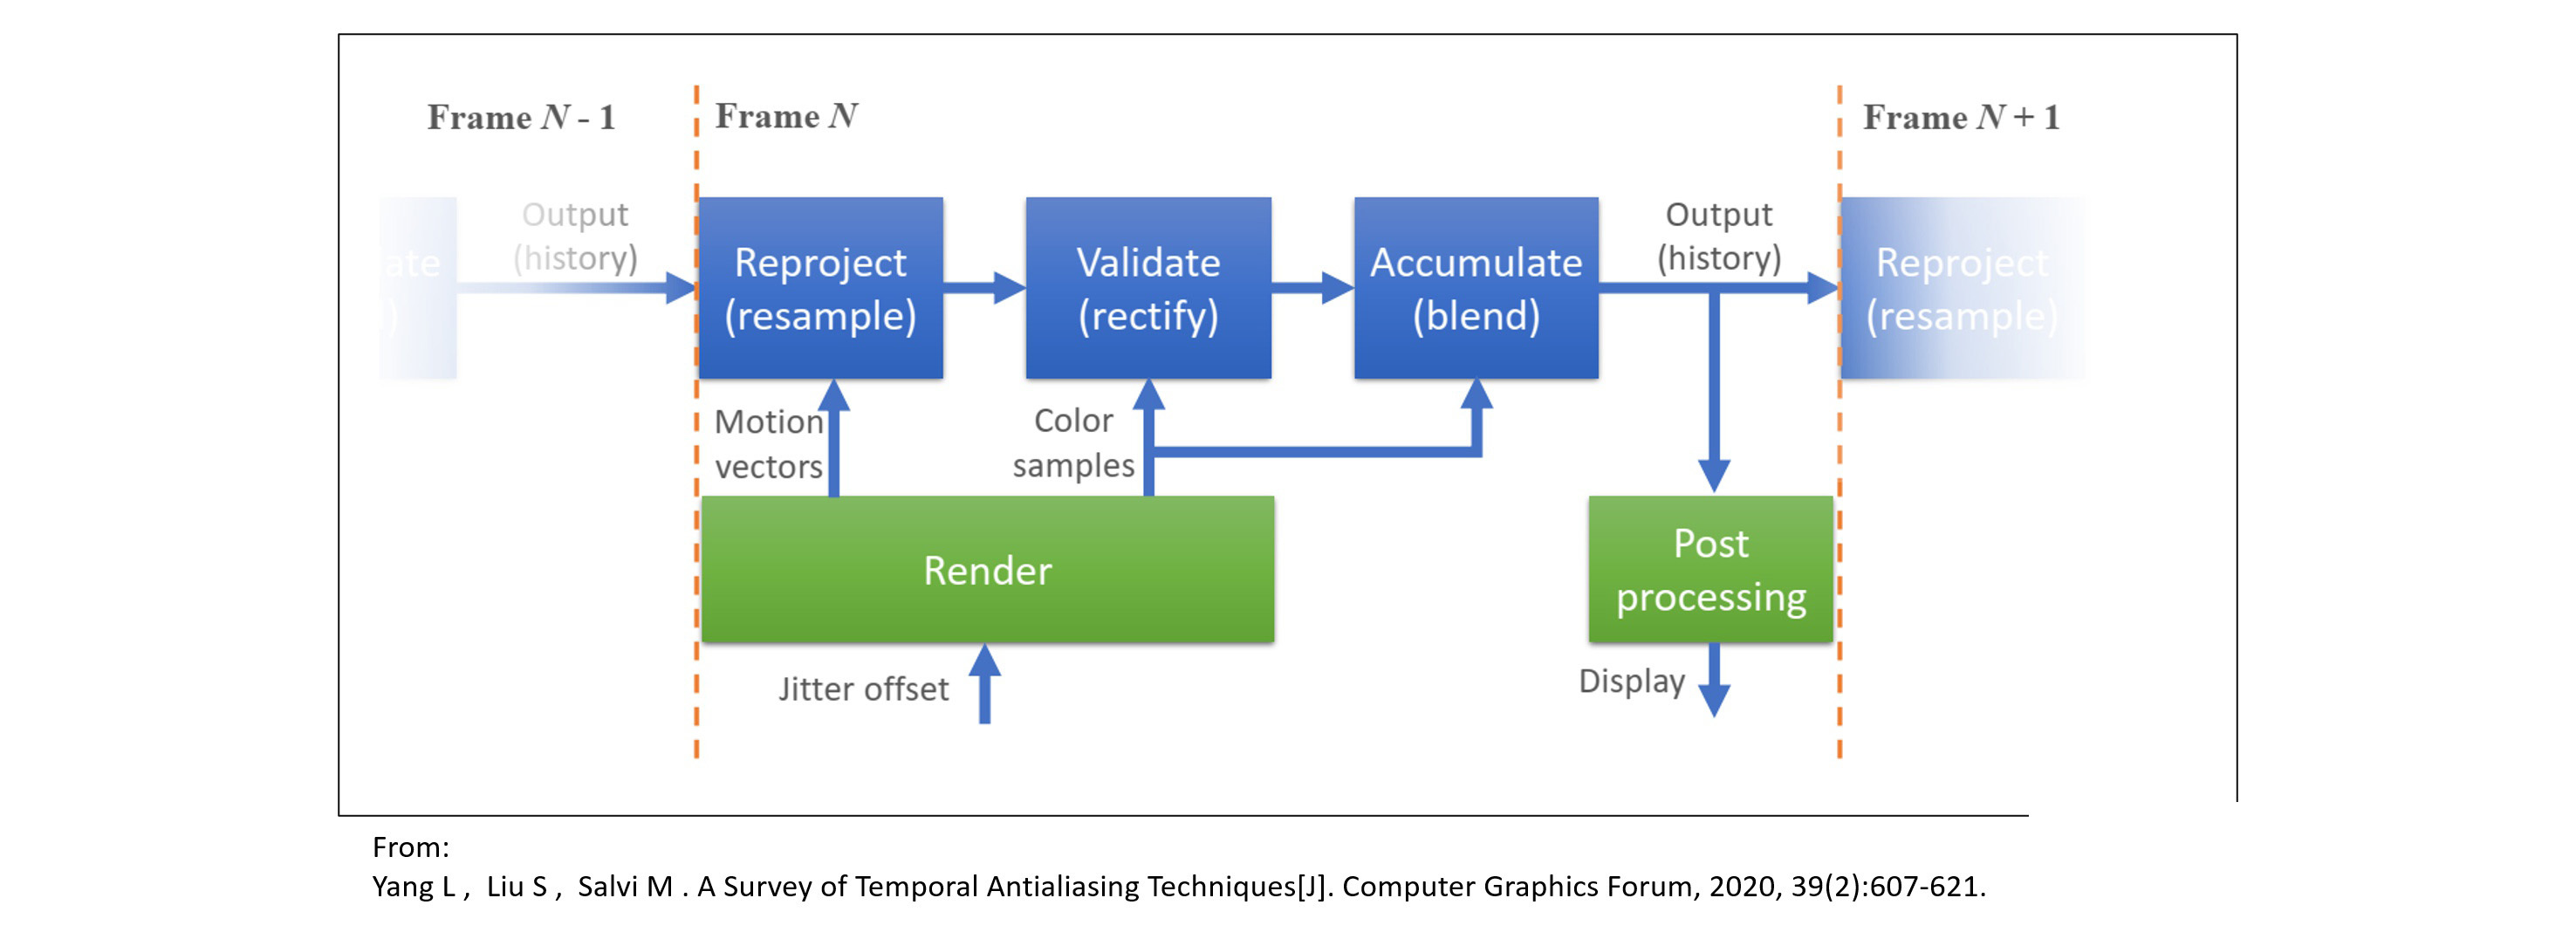 关于TAA应当在管线中的哪一个位置: - TAA应当是在渲染完成后进行的 - 如果在ToneMap前TAA,那么输入到TAA环节的将会是HDR数据,抗锯齿效果不好。因为经过ToneMap之后,HDR变为LDR数据,频谱上的”尖刺“会被抹除,减少闪烁的问题。 - 如果在ToneMap后TAA,那么会影响到后续需要 HDR 的特效的计算(比如Bloom) - 虚幻采用的方法是:在TAA之前进行一次简单的ToneMap,在TAA之后进行ToneMap的逆变换,再进行后续的后处理和正式的ToneMap  ### Ghosting 但是有个问题是,当前帧有的像素可能根本不存在于历史记录中,它是在这一帧新出现的。比如下图中,因为遮挡关系,出现了一个新的像素。  如果在前后颜色差距过大的情况下直接进行混合,得到结果会出现**Ghosting**(鬼影)现象: 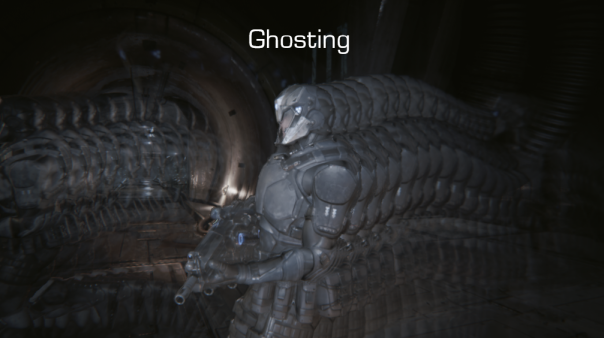 为了缓解这一现象,我们可以对比当前帧和历史帧(以及相邻的像素),将历史帧的颜色**截断**(clamp/clip)在合理的范围内。(下文实现过程中详细讲解) ### Flickering 除了Ghosting之外,TAA还有一个常见问题:**Flickering**(**闪烁**)。其常见于静态的场景和静态的相机下。  这是抖动导致的不收敛,子采样点存在部分高频信息,混合后造成的闪烁。本质上是高频信息被离散的光栅化方法限制的问题。 举个例子。上文提到,为了减少ghosting的现象,会采用方法:根据当前帧(以及当前帧的周围像素)的数据截断历史帧数据。 假如历史帧存在高光,而当前帧却因为子采样点的抖动没有采样到高光信息,历史帧的高光信息就会被截断,就会导致这一高光“忽隐忽现”。 以上是着色走样(Shading Alias)导致的闪烁问题,此外还有另一个几何走样(Geometry Alias)问题导致的闪烁: > **当一个在屏幕空间极其细小的三角形经过光栅化时,谁都不能在看到显示结果时得知其是否被光栅化到了某一个像素上,这就是“薛定谔的光栅化”。** > > 这并不是一句玩笑话也不是危言耸听,原因其实是:Temporal AA阶段进行的Jitter处理实际上是随机或伪随机的,所以这时投影矩阵的偏移量实际上是不能确定的,这就意味着我们并没有办法去预测某个像素点是否被光栅化,那么这种情况表现出来的问题也很明显了,在游戏中当远处有一些细密的三角形分布,如树叶,网格栅栏,百叶窗等,就会产生难以抑制的闪烁,这种闪烁的出现纯粹是因为“某个像素点上的内容不确定”而非单纯的“色彩不确定”,所以通过上方文章的方法实际能解决的程度非常有限,因此这里我们需要使用另外的办法来进行压制。 > > (参考自[Temporal AA Anti-Flicker - MaxwellGeng](https://zhuanlan.zhihu.com/p/71173025)) 解释如下图,黑点代表着每一帧的不同的子采样点,一个细长的三角形在左上角的像素中只被一个子采样点覆盖到,那么在没有采取该子采样点的时候,当前帧的这一像素是“不存在”该三角形的,意味着之后的历史帧中会消除这一三角形的存在。而轮到采取该子采样点时,当前帧中却又突然出现了这一三角形的颜色,于是就导致了闪烁的问题。 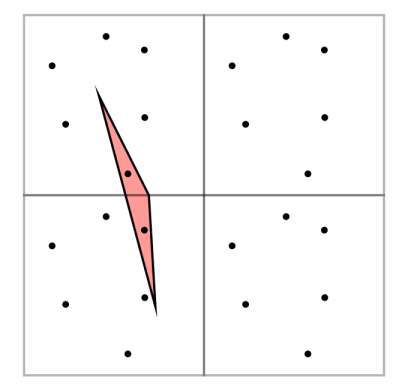 ## 实现 先来看看实现了延迟渲染之后,因为没有了MSAA,锯齿变得明显了很多。 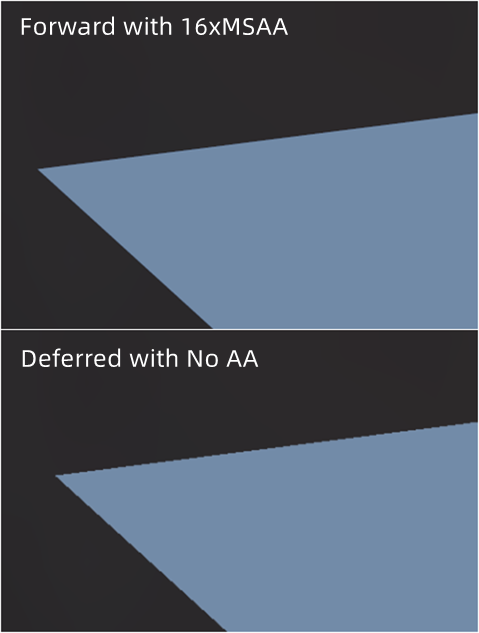 ### 抖动 关于抖动的偏移,我们可以用均匀的子采样点。但是,采用低差异序列效果会更好,虚幻采用的是 [Halton(2,3)](http://en.wikipedia.org/wiki/Halton_sequence) 序列: 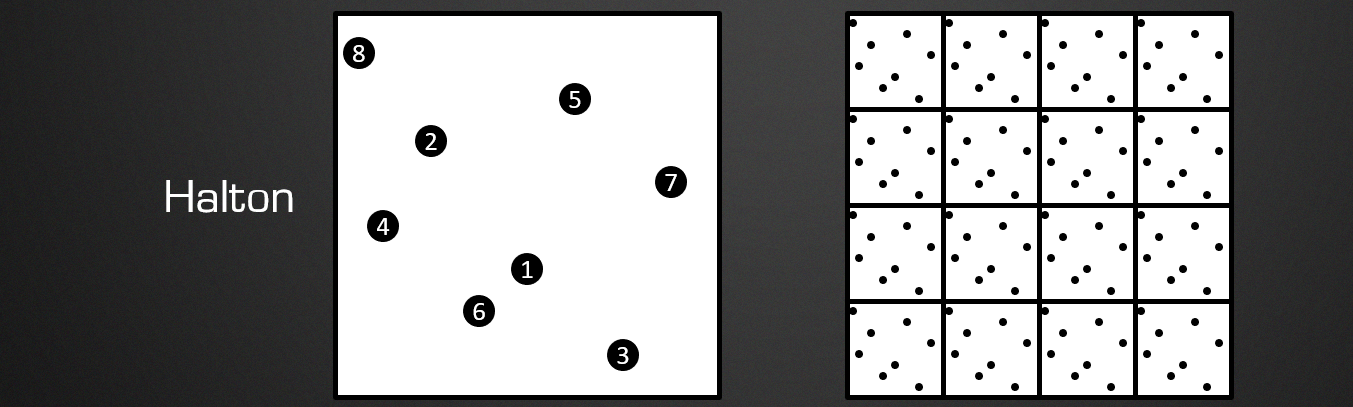 ```glsl const vec2 Halton_2_3[8] = { vec2(0.0f, -1.0f / 3.0f), vec2(-1.0f / 2.0f, 1.0f / 3.0f), vec2(1.0f / 2.0f, -7.0f / 9.0f), vec2(-3.0f / 4.0f, -1.0f / 9.0f), vec2(1.0f / 4.0f, 5.0f / 9.0f), vec2(-1.0f / 4.0f, -5.0f / 9.0f), vec2(3.0f / 4.0f, 1.0f / 9.0f), vec2(-7.0f / 8.0f, 7.0f / 9.0f) }; ``` 为了实现在采样时的子采样点抖动偏移,我们可以在**延迟渲染的几何pass阶段**的**顶点着色器**当中修改`gl_Position` 变量。 原本的`gl_Position` 是:(projection × view × model × 顶点的局部坐标),得到的是该顶点在映射到裁剪空间的坐标,其xy即为在二维屏幕上对应的位置($[-1, 1]^2$),所以我们只需要将xy分别加上 `偏移/屏幕宽高` 即可。可以直接修改projection矩阵:  以上为**列主序**。之所以是20和21而不是30和31,因为之后需要进行一次**齐次除法**。可以试试用修改过的投影矩阵乘以一个(x,y,z,1)的向量之后再进行齐次除法。 ```glsl ... void main() { ... float deltaWidth = 1.0/screenWidth, deltaHeight = 1.0/screenHeight; vec2 jitter = vec2( Halton_2_3[offsetIdx].x * deltaWidth, Halton_2_3[offsetIdx].y * deltaHeight ); mat4 jitterMat = projection; jitterMat[2][0] += jitter.x; jitterMat[2][1] += jitter.y; vec3 nowPositon = ...; gl_Position = jitterMat * view * model * vec4(nowPositon, 1.0); ... } ``` ### velocity向量 为了获得像素在当前帧和上一帧的在屏幕空间上的位移变化,我们还需要将上一帧的MVP矩阵传进来: **几何Pass的顶点着色器** ```glsl layout(std140, binding=1) uniform TaaUniforms { mat4 preProjection; mat4 preView; mat4 preModel; ... }; void main() { ... vout.preScreenPosition = preProjection * preView * preModel * vec4(nowPositon, 1.0); // 注意这里就不要添加jitter了 vout.nowScreenPosition = projection * view * model * vec4(nowPositon, 1.0); } ``` 然后在片段着色器当中将两个坐标相减,得到velocity向量,将其存储在一个额外的RT纹理的RB通道当中: **几何Pass的片段着色器** ```glsl layout(location=0) out vec3 gPos; layout(location=1) out vec3 gNormal; layout(location=2) out vec3 gAlbedo; ... layout(location=5) out vec2 gVelo; ... void main() { // position/normal/alebdo等 ... // velocity vec2 newPos = ((vin.nowScreenPosition.xy / vin.nowScreenPosition.w) * 0.5 + 0.5); vec2 prePos = ((vin.preScreenPosition.xy / vin.preScreenPosition.w) * 0.5 + 0.5); gVelo = newPos - prePos; } ``` 效果: 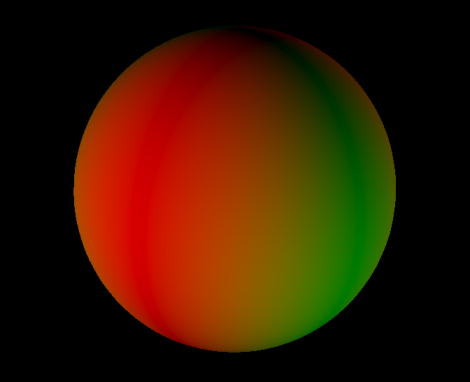 存储velocity的纹理记得用**R16G16**的格式,因为velocity的阈值都在[-1,1],所以对精度要求很高 ### 混合 在延迟渲染的几何Pass和光照计算Pass之后,轮到了TAA **TAA的顶点着色器**就是简单的渲染屏幕四边形 ```glsl #version 450 core layout (location = 0) in vec2 aPos; layout (location = 1) in vec2 aTexCoords; out vec2 screenPosition; void main() { screenPosition = aTexCoords; gl_Position = vec4(aPos.x, aPos.y, 0.0, 1.0); } ``` 接着在**TAA的片段着色器**当中: ```glsl #version 450 core layout(binding=0) uniform sampler2D currentColor; layout(binding=1) uniform sampler2D previousColor; layout(binding=2) uniform sampler2D velocityTexture; layout(binding=3) uniform sampler2D currentDepth; uniform float ScreenWidth; uniform float ScreenHeight; uniform int frameCount; in vec2 screenPosition; out vec4 outColor; vec2 getClosestOffset() { vec2 deltaRes = vec2(1.0 / ScreenWidth, 1.0 / ScreenHeight); float closestDepth = 1.0f; vec2 closestUV = screenPosition; for(int i=-1;i<=1;++i) { for(int j=-1;j<=1;++j) { vec2 newUV = screenPosition + deltaRes * vec2(i, j); float depth = texture2D(currentDepth, newUV).x; if(depth < closestDepth) { closestDepth = depth; closestUV = newUV; } } } return closestUV; } void main() { vec3 nowColor = texture(currentColor, screenPosition).rgb; if(frameCount == 0) { outColor = vec4(nowColor, 1.0); return; } // 周围3x3内距离最近的速度向量 vec2 velocity = texture(velocityTexture, getClosestOffset()).rg; vec2 offsetUV = clamp(screenPosition - velocity, 0, 1); vec3 preColor = texture(previousColor, offsetUV).rgb; // 混合 float c = 0.05; outColor = vec4(c * nowColor + (1-c) * preColor, 1.0); } ``` [inside制作组](http://twvideo01.ubm-us.net/o1/vault/gdc2016/Presentations/Pedersen_LasseJonFuglsang_TemporalReprojectionAntiAliasing.pdf) 和虚幻都提到过,采样velocity时,因为物体轮廓周围的velocity也可能是有锯齿的,所以物体轮廓边缘可能会失去抗锯齿的效果。可以比较该像素周边3x3像素的深度,**选用深度最小的那一个的velocity**。(虚幻是选择在5×5的范围内选取四个拐角和中心五个点来比较) 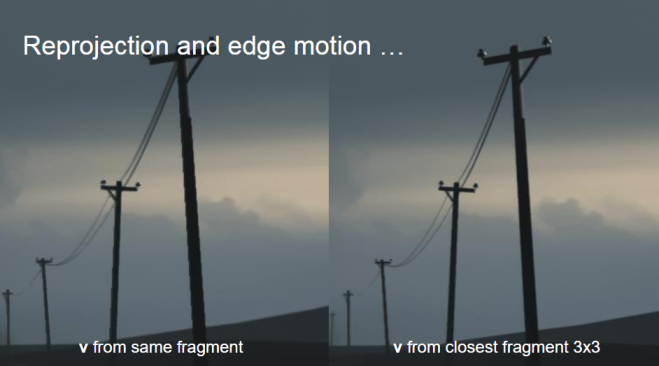 直接进行历史帧混合,这时就已经完成了一个基本的TAA流程。抗锯齿效果如下: 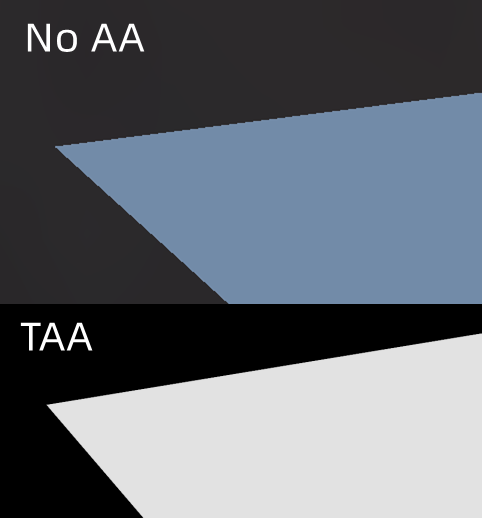 确实也看到了Ghosting现象: 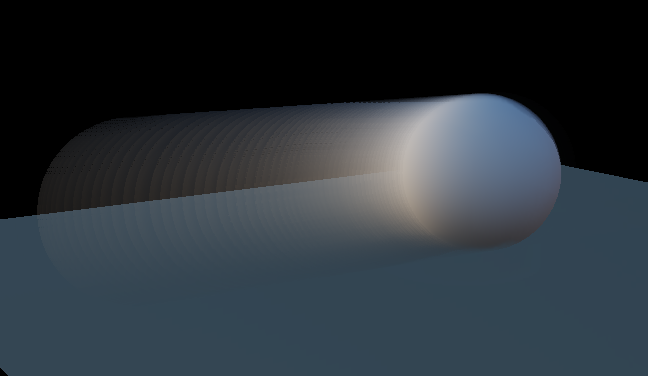 ### 缓解Ghosting 如上文所说,我们需要将历史帧颜色截断在一个合理的范围。 我们会根据当前帧当前像素周围的5个或9个像素的颜色作为依据,来截断采样到的历史帧颜色。 将颜色的RGB三个通道当做AABB的三维,我们可以求出这9个像素的颜色的AABB。 ```glsl vec3 aabbMin = nowColor, aabbMax = nowColor; vec2 deltaRes = vec2(1.0 / ScreenWidth, 1.0 / ScreenHeight); for(int i=-1;i<=1;++i) { for(int j=-1;j<=1;++j) { vec2 newUV = screenPosition + deltaRes * vec2(i, j); vec3 C = texture(currentColor, newUV).rgb; aabbMax = max(aabbMax, C); aabbMin = min(aabbMin, C); } } ``` **①** 这里将色彩先转换到 [YCgCo](https://en.wikipedia.org/wiki/YCoCg) 色彩空间内效果会更好,可以减少闪烁现象: ```glsl vec3 RGB2YCoCgR(vec3 rgbColor) { vec3 YCoCgRColor; YCoCgRColor.y = rgbColor.r - rgbColor.b; float temp = rgbColor.b + YCoCgRColor.y / 2; YCoCgRColor.z = rgbColor.g - temp; YCoCgRColor.x = temp + YCoCgRColor.z / 2; return YCoCgRColor; } vec3 YCoCgR2RGB(vec3 YCoCgRColor) { vec3 rgbColor; float temp = YCoCgRColor.x - YCoCgRColor.z / 2; rgbColor.g = YCoCgRColor.z + temp; rgbColor.b = temp - YCoCgRColor.y / 2; rgbColor.r = rgbColor.b + YCoCgRColor.y; return rgbColor; } ``` **②** 先前提到先做一次简单的ToneMap再做逆变换,这里选用虚幻提到的[Tone mapping](http://graphicrants.blogspot.com/2013/12/tone-mapping.html)方法: ```glsl float Luminance(vec3 color) { return 0.25 * color.r + 0.5 * color.g + 0.25 * color.b; } vec3 ToneMap(vec3 color) { return color / (1 + Luminance(color)); } vec3 UnToneMap(vec3 color) { return color / (1 - Luminance(color)); } ``` 接着做clamp截断: 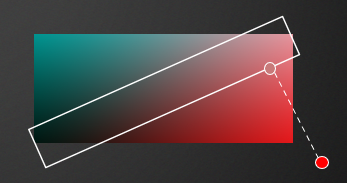 ```glsl // clamp preColor = clamp(preColor, aabbMin, aabbMax); ``` 不过**clip**的效果其实比**clamp**好,这样不会收集到包围盒角落的色彩。 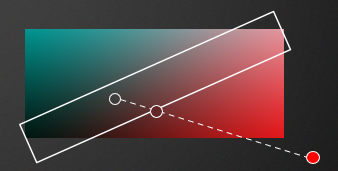 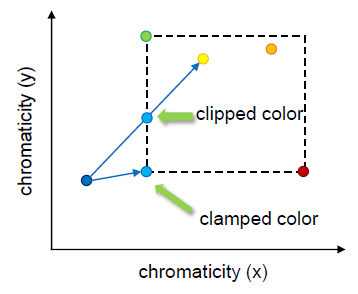 ```glsl // clip to center vec3 p_clip = 0.5 * (aabbMax + aabbMin); vec3 e_clip = 0.5 * (aabbMax - aabbMin); vec3 v_clip = preColor - p_clip; vec3 v_unit = v_clip.xyz / e_clip; vec3 a_unit = abs(v_unit); float ma_unit = max(a_unit.x, max(a_unit.y, a_unit.z)); if (ma_unit > 1.0) return p_clip + v_clip / ma_unit; else return preColor;// 本身就在 aabb 中 ``` [英伟达在gdc](https://developer.download.nvidia.cn/gameworks/events/GDC2016/msalvi_temporal_supersampling.pdf)提过,统计box边界的时候,可以用Variance Clip,因为在用AABB统计的时候,约束后的结果可能依然离当前结果非常远,如下图: 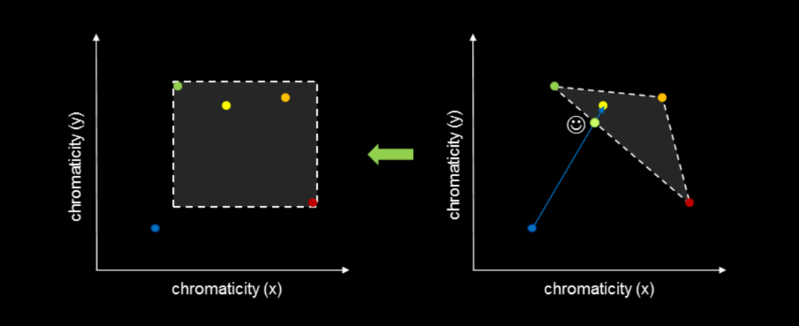 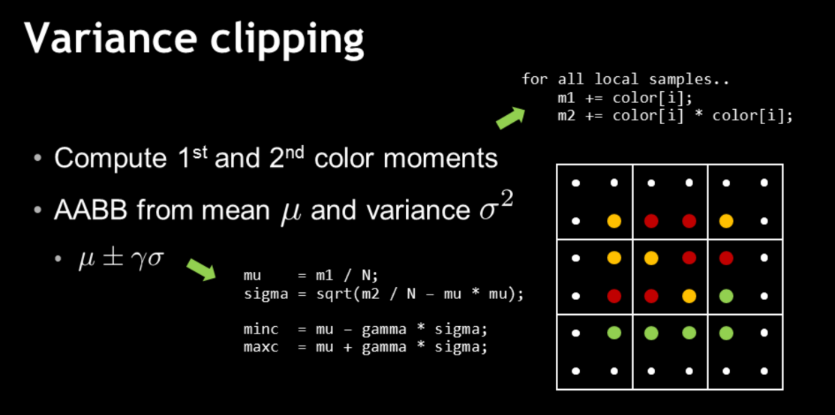 ```glsl vec3 aabbMin = nowColor, aabbMax = nowColor; vec2 deltaRes = vec2(1.0 / ScreenWidth, 1.0 / ScreenHeight); vec3 m1 = vec3(0), m2 = vec3(0); for(int i=-1;i<=1;++i) { for(int j=-1;j<=1;++j) { vec2 newUV = screenPosition + deltaRes * vec2(i, j); vec3 C = RGB2YCoCgR(ToneMap(texture(currentColor, newUV).rgb)); //aabbMax = max(aabbMax, C); //aabbMin = min(aabbMin, C); m1 += C; m2 += C * C; } } // Variance clip const int N = 9; const float VarianceClipGamma = 1.0f; vec3 mu = m1 / N; vec3 sigma = sqrt(abs(m2 / N - mu * mu)); aabbMin = mu - VarianceClipGamma * sigma; aabbMax = mu + VarianceClipGamma * sigma; ``` 最后完整的glsl代码: ```glsl #version 450 core layout(binding=0) uniform sampler2D currentColor; layout(binding=1) uniform sampler2D previousColor; layout(binding=2) uniform sampler2D velocityTexture; layout(binding=3) uniform sampler2D currentDepth; uniform float ScreenWidth; uniform float ScreenHeight; uniform int frameCount; in vec2 screenPosition; out vec4 outColor; vec3 RGB2YCoCgR(vec3 rgbColor) { vec3 YCoCgRColor; YCoCgRColor.y = rgbColor.r - rgbColor.b; float temp = rgbColor.b + YCoCgRColor.y / 2; YCoCgRColor.z = rgbColor.g - temp; YCoCgRColor.x = temp + YCoCgRColor.z / 2; return YCoCgRColor; } vec3 YCoCgR2RGB(vec3 YCoCgRColor) { vec3 rgbColor; float temp = YCoCgRColor.x - YCoCgRColor.z / 2; rgbColor.g = YCoCgRColor.z + temp; rgbColor.b = temp - YCoCgRColor.y / 2; rgbColor.r = rgbColor.b + YCoCgRColor.y; return rgbColor; } float Luminance(vec3 color) { return 0.25 * color.r + 0.5 * color.g + 0.25 * color.b; } vec3 ToneMap(vec3 color) { return color / (1 + Luminance(color)); } vec3 UnToneMap(vec3 color) { return color / (1 - Luminance(color)); } vec2 getClosestOffset() { vec2 deltaRes = vec2(1.0 / ScreenWidth, 1.0 / ScreenHeight); float closestDepth = 1.0f; vec2 closestUV = screenPosition; for(int i=-1;i<=1;++i) { for(int j=-1;j<=1;++j) { vec2 newUV = screenPosition + deltaRes * vec2(i, j); float depth = texture2D(currentDepth, newUV).x; if(depth < closestDepth) { closestDepth = depth; closestUV = newUV; } } } return closestUV; } vec3 clipAABB(vec3 nowColor, vec3 preColor) { vec3 aabbMin = nowColor, aabbMax = nowColor; vec2 deltaRes = vec2(1.0 / ScreenWidth, 1.0 / ScreenHeight); vec3 m1 = vec3(0), m2 = vec3(0); for(int i=-1;i<=1;++i) { for(int j=-1;j<=1;++j) { vec2 newUV = screenPosition + deltaRes * vec2(i, j); vec3 C = RGB2YCoCgR(ToneMap(texture(currentColor, newUV).rgb)); m1 += C; m2 += C * C; } } // Variance clip const int N = 9; const float VarianceClipGamma = 1.0f; vec3 mu = m1 / N; vec3 sigma = sqrt(abs(m2 / N - mu * mu)); aabbMin = mu - VarianceClipGamma * sigma; aabbMax = mu + VarianceClipGamma * sigma; // clip to center vec3 p_clip = 0.5 * (aabbMax + aabbMin); vec3 e_clip = 0.5 * (aabbMax - aabbMin); vec3 v_clip = preColor - p_clip; vec3 v_unit = v_clip.xyz / e_clip; vec3 a_unit = abs(v_unit); float ma_unit = max(a_unit.x, max(a_unit.y, a_unit.z)); if (ma_unit > 1.0) return p_clip + v_clip / ma_unit; else return preColor; } void main() { vec3 nowColor = texture(currentColor, screenPosition).rgb; if(frameCount == 0) { outColor = vec4(nowColor, 1.0); return; } // 周围3x3内距离最近的速度向量 vec2 velocity = texture(velocityTexture, getClosestOffset()).rg; vec2 offsetUV = clamp(screenPosition - velocity, 0, 1); vec3 preColor = texture(previousColor, offsetUV).rgb; nowColor = RGB2YCoCgR(ToneMap(nowColor)); preColor = RGB2YCoCgR(ToneMap(preColor)); preColor = clipAABB(nowColor, preColor); preColor = UnToneMap(YCoCgR2RGB(preColor)); nowColor = UnToneMap(YCoCgR2RGB(nowColor)); float c = 0.05; outColor = vec4(c * nowColor + (1-c) * preColor, 1.0); } ``` ### 缓解flickering 上文提到的:ToneMap, YCoCg色彩空间,Variance Clamp等等的方法其实都是减少闪烁现象的尝试,其本质上就是在试图**削除高频率的色彩**,这也正是虚幻所提的消除闪烁的基本思想。  除此之外,虚幻做过以下尝试: ① 在TAA之后进行一次**滤波**,虽然可以有效减少闪烁,但是会让画面比较模糊 ② 将历史(是否被clamp)数据存储在Alpha通道里,根据其减少混合系数(减少当前帧的影响),之后随着时间慢慢恢复。但是这一方法会导致鬼影和模糊,甚至有可能导致走样的结果。 ③ 基于方法2的改进,当历史帧数据靠近clamp范围时,减少混合系数,这样不需要额外的空间。 不过,闪烁仍然是一个未解决的问题,虚幻在PPT当中用 ”Extremely difficult!“ 来形容这一问题。  还有就是在前文提到的,几何走样导致的闪烁,具体解决方法可以参考[原文](https://zhuanlan.zhihu.com/p/71173025),原作者讲的很详细 ## Reference [1] [DX12渲染管线(2) - 时间性抗锯齿(TAA)](https://zhuanlan.zhihu.com/p/64993622) [2] [主流抗锯齿方案详解(二)TAA](https://zhuanlan.zhihu.com/p/425233743) [3] [TAA tutorial](https://docs.google.com/document/d/15z2Vp-24S69jiZnxqSHb9dX-A-o4n3tYiPQOCRkCt5Q/edit#) [4] [Temporal AA Anti-Flicker](https://zhuanlan.zhihu.com/p/71173025) [5] [HIGH-QUALITY TEMPORAL SUPERSAMPLING - Brian Karis (Epic Games, Inc.)](http://advances.realtimerendering.com/s2014/#_HIGH-QUALITY_TEMPORAL_SUPERSAMPLING) [6] [An Excursion in Temporal Supersampling - NVDIA](https://developer.download.nvidia.cn/gameworks/events/GDC2016/msalvi_temporal_supersampling.pdf) [7] [Temporal Reprojection Anti-Aliasing in INSIDE](http://twvideo01.ubm-us.net/o1/vault/gdc2016/Presentations/Pedersen_LasseJonFuglsang_TemporalReprojectionAntiAliasing.pdf) 最后修改:2022 年 03 月 11 日 10 : 34 PM © 允许规范转载